Friday, September 26, 2014

Quick & Easy Custom Onesie Tutorial

I made this adorable custom onesie for my baby girl for her first Halloween. It was so quick.
It is such an easy and fun tutorial! If you have any questions, please let me know! Custome Baby Onesie,


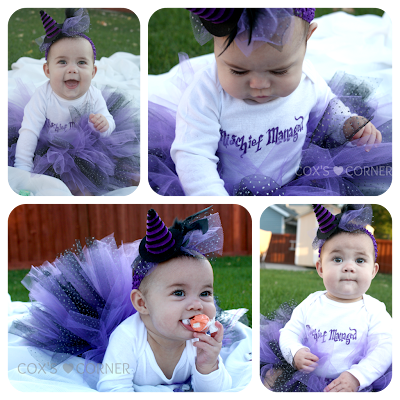
I made this as a gift for my friends baby shower and it seriously took less than 15 minutes. It is so easy! Here's the tutorial:


Supplies:

Onesies or T-Shirt (white works the best)

Piece of cardboard that will stretch out your shirt

Fabric Marker (I prefer the "Stained" brand by Sharpie, they work the best)

Print out using black font of what you'd like your shirt to say


To start out, I searched for free Harry Potter fonts and downloaded them. Then I typed up "Mischief Managed" and "Muggle Born" in my desired fonts. Print them out on cardstock. Trim them to fit in between your shirt and your cardboard piece.

Slide your cut piece in between your shirt and your piece of cardboard.

Anchor your shirt AND the writing so that your shirt is taught and your cardstock underneath doesn't slide around.

Then you just trace over your phrase with your marker carefully.

It won't look identical but it will be pretty darn close!

It was such a seriously quick project that I cranked out several of them at the same time!

If you would like to see how I made the rest of my baby girls outfit, I will be sharing the bow tutorial soon, and you can find the tutu tutorial with a twist here. I used 2 strips of purple and 1 strip of black polka dot tulle.

Thank you so much for stopping by. I love having you here to visit!


SHARE:

Wednesday, September 24, 2014

Mickey Mouse Cake Tutorial

Hi friends! I wanted to share with you guys my simple Mickey Mouse Cake tutorial using things you most likely already have at home! I wrote this back when I was Cox's Corner, but it is still one of my favorites! 


Supplies:
Cake mix
Pyrex Bowl
Construction Paper
Can or other round object
Toothpicks
Double Sided Tape
Frosting
Black Food Coloring
Golden Yellow Food Coloring (I used the wilton ones)
Star Tip
Writing Tip
Disposable Frosting Bags
Scissors


Bake your cake according to the mix directions in your pyrex bowl. I just searched google to help me figure it out. It's pretty straight forward though...
Step 1: Dye your frosting. I used the end of a spoon for the black and a toothpick for the yellow. You will use a LOT of black food coloring...and heads up...don't freak out if your little ones "business" is a funny color the next day...it's because of the food coloring. Just telling ya like it is. Make sure you mix your frosting really well. There should be no streaks. You basically keep adding color until it's to your desired tone. With the black though, it will still be gray, but as it sits, it gets darker, so keep that in mind...


 Step 2: For your ears, find a round can or stencil, whatever you can find that will give you the size of ears you'd like. I was able to just use a can of peaches and it worked great! You will need 4 circles. Double Stick tape your toothpicks to a circle, then place another circle on top of them. Then stick your ears in your cake. Easy peasy. You can totally see the cake taking shape now!


Step 3. I like to keep a damp paper towel next to me when I'm working so that when my tip gets goopy I can wipe it off and continue. Start in the back of your cake and make starts all the way around your base. To make a start tip you basically start close to your cake and squeeze your bag slowly, once your star is the size you want, STOP squeezing the bag, lightly as in barely push your tip in and then pull it straight out away from your cake. If my description was WAY too confusing, I highly recommend just searching on you tube! :) Once you finish a row, start another one right above it and repeat. When you get close to the top of your hat, You may need to add a little frosting to make it more rounded at the top. Just squeeze some frosting on there until you get your rounded shape, then cover it up as you continue your row of stars.


Step 4. To decorate your ears, start from the outer edge and work your way in doing rows of stars. You will do the same thing to all sides of your ears.  And that's it for the black! Easy right? This cake seriously took me only 30 minutes to decorate!


 Step 5. For your writing, you can choose a larger tip or a smaller one. I personally prefer the smaller tip, but I wanted to show you the difference between the two. I just free handed the writing. If you're uncomfortable with writing, there are tools that you can buy that will help you stamp out the letters and then you just trace them. Or I bet you could use a toothpick and lightly write the letters in your frosting and then go over it with your writing color. Or...you could just leave it blank! It's all up to you!


I just love the way it turned out and it was SO easy to make! If you have any questions please let me know!

Thanks for stopping by! If you liked what you see, I'd love for you to follow me! I'm always thinking up a new tutorial or idea!


SHARE:

Monday, September 22, 2014

ABC-I Love You Free Printable in 5 colors

I shared an ABC I love you printable on my blog a while ago. 
It was only available in one color, but for you I have decided to make 5 more!   All you have to do is click on the picture and save it to your computer and you've got yourself a cute ABC/I LOVE YOU Printable! 


If you're looking for even more colors, my favorite can be found on ETSY and she can totally personalize the colors just for you!


SHARE:

Saturday, September 20, 2014

Halloween Bucket List Printable

I've been getting so excited for Halloween. Since October is coming in just a matter of days I wanted to do a countdown of sorts for October to get my babies excited for Halloween since I am for some reason. So I created a Halloween Bucket List with 31 activities on it. 
I've included the one I will use as well as a blank on for you. 
Here's mine with all of our activities on it.  

Here's the blank one:

Just in case you can't read the activities on the list or would rather create your own here are all of my activities. I will try and provide a link to as many of them as I can find links for. I'm so looking forward to October! 

Go to the Zoo
Trick or Treat at Daddy's Work
Watch Hocus Pocus
Decorate Pumpkins
Backyard Campfire
SHARE:

Friday, September 19, 2014

Jack-O-Lantern Trio Tutorial

These Jack-O-Lantern blocks turned out so cute! I'm kinda bummed I gave them away. I think I will have to make myself another set this year! 
 It is made from three 4x4 pieces of wood ranging in height of 4, 6, and 8 inches. The coolest thing about this is that you can use them for halloween and then flip them around for fall! 
Love it! She is selling her own finished sets on her site at Fabdecor.com or you can just buy the wood and vinyl. My kit consisted of the wood and vinyl and I put my own spin on the project. If you'd like to try mine here's the tutorial! You'll have to let me know if you try it!
Supplies:
Scrapbook paper (I used 3 different sheets of orange and one sheet of brown)
Jack-O-Lantern trio OR 3 pieces of 4x4's cut to 4, 6, and 8 inches long.  And 3 stems.
Pumpkin Faces
Orange & Brown Paint
Mod Podge
Sponge Brush
Orange Glitter Tulle
Pencil
Craft Wire

To begin trace each of your pieces of wood onto your scrapbook paper twice. So you will have a piece for the front and a piece for the back of your pumpkin in each of your three different sheets of scrapbook paper.

Paint each of your pumpkins and your stems and set them aside to dry. I started from the biggest and went to the smallest so the biggest had the longest time to dry.

I had to make my own brown for the stems and added the scrapbook paper to the top.

Choose which faces go with which scrapbook paper design. Then start mod podging your papers to your pumpkins. I worked largest to smallest again. Front to back. I'd attach the paper to the wood on the front, then attach it to the back. Then I would put a layer of mod podge on top of the scrapbook paper in the back and set it aside and do the next pumpkin.

After they all had a layer mod podge on top of the back piece of the scrapbook paper I went back to the largest pumpkin and started attaching the faces.

After the face was attached I put a layer of mod podge on top of the vinyl and scrapbook paper to make sure I had a nice seal and make sure my project was more durable.

Then I started prepping the toppers while the mod podge dried. I cut tulle into rectangle pieces approx 3x6 and pinched them in the middle and fastened it with string so they looked like little bows. I made two per pumpkin.

Then I cut 11 pieces of craft wire 5.5 inches long and wrapped them around a dowel to get them to make a cute little spiral.

I went to work in the tops. For the tallest pumpkin I glued in the stem first with a huge amount of hot glue in the middle of the stem so that it stuck up a little from the top of the pumpkin. Then I added my tulle bows to the front and the back of the pumpkin and 4 of my wire spirals. Two in front, two in back.

For my middle pumpkin I did the same as the tallest except I arranged the wires differently to resemble bangs.

And then for the baby pumpkin I did the same as above with the stem and the tulle, but I only added one curly in the front for a cute little curly q and had two in the back.

I love how they all have different personalities! They look like a little family! Here's another picture of my cute little pumpkin family from the front:

And again from the back:

Isn't it so fun?! There are several other bloggers who took part in this series and you can head over here to check out the different ways that they personalized their kits! It's really cool to see the different ways that people create. I love it!

SHARE:

Wednesday, September 17, 2014

Fall Wooden Plate Decor

If you're new here then you don't know that I used to be Cox's Corner. A couple years ago I was part of a craft challenge and made this darling fall plate:

I was so excited to receive the package for the challenge! 

 Inside of it was a wooden plate,
2 pieces of double sided scrapbook paper,
1 sheet of black vinyl,
1 sheet of orange sparkly vinyl,
1 sheet of green sparkly vinyl,
transfer paper,
a roll of adhesive,
small package of Halloween style buttons,
and a few black and white flowers.


 Also, there was information on a craft challenge. We were to take the contents of the box and create a fun project out of it!

Would you like to see what I came up with? I'm a little bummed that the pictures don't really do it justice...but here it is!


I first spray painted my plate brown. While it was drying I got out my Cameo and set to work. I'm not going to lie, having a cutting machine, specifically a cameo, really helped in getting this project done quickly. However, if you don't have a cameo you can still try your hand at this project!


1. I decided which sheet would be my bottom layer. I measured the inside circle of my plate and it was approximately 9.8 inches. So I told my Cameo to cut a 9.8 inch circle out of it.  You could use a compass (those old school math things with a pencil) or a plate and trace around it.


2. I used the adhesivethey sent me to make sure my bottom sheet stayed in place.


3. I took the second sheet of scrapbook paper and created a scalloped circle border by first choosing a basic 9.8 inch scalloped circle as a background and then adding a smaller circle to the inside. My Cameo then cut both shapes for me leaving me with a border. If you don't have a cameo, You could cut your own scallop edged circle by tracing one you printed off online and cutting around it. Then trace around a smaller plate that is inside of your circle. Then cut it out.


4. Here's where it might get tricky if you don't have a Cameo, but it can still be done. I cut out the word grateful in one of my favorite fonts from the orange vinyl. Then using transfer tape I placed it where I thought it would look best.


5. I cut out two small circles from the green vinyl and put it on each side of my grateful. I could tell that it needed a little more...


6. I then cut out small pumpkins and stems out of the orange and green vinyl and placed them on every other scalloped edge around the circle.


7. I decided as a finished touch, I would add a cute pennant banner. So I cut out triangles from the scraps of my paper that I had left over. Hole punched a couple of corners. Distressed the edges of the triangles with distressing ink. Then threaded some bakers twine to make a banner.


8. I then tied my twine in a bow through two black buttons. One on each side. Then, I stuck my banner on with adhesive on the back of each button, and that's it!


I really LOVE the way this cute little plate turned out.


If you like mine, you should see the Christmas one my mom made! She blogs over at Ninja Grandma!


SHARE:

Monday, September 15, 2014

Halloween Blocks

A couple Halloweens ago, my amazing friend Lindsay from Artsy Fartsy Mama hosted a "crafternoon" at her house. It was seriously such a blast! I LOVE crafting, and when I get to spend time with awesome people, it makes it even better! She is so creative and talented and I'm so happy that I know her...she's one of those people where you're certain you were meant to be friends with from the beginning...it just took a little time to find them. Like a bosom buddy or something like that! I seriously LOVE this girl!

Here's how my little mummy block turned out:

Isn't it so cute?! It was awesome because you could copy hers or put your own spin on them! I put my own spin on a couple, and followed hers for the others. Here they are all together:

If you would like to make your own or just see the originals, Lindsay has an awesome tutorial on her blog! So head on over and tell her Jess sent ya!
SHARE:
MINIMAL BLOGGER TEMPLATES BY pipdig